keto brioche bread
Introduction
Ah, brioche! The mere mention of it conjures up images of delicate, buttery, slightly sweet bread that is perfect for breakfast, as part of a fancy sandwich or simply enjoyed on its own. This classic French bread, with its rich golden crumb and tender texture, has long been a culinary delight. However, traditionally, brioche is a carb-lover’s dream and a keto dieter’s nightmare. It is laden with wheat flour and sugar, making it off-limits for anyone following a low-carb lifestyle. But what if you could enjoy brioche without derailing your keto goals?
Enter the Keto Brioche Bread: a revolutionary take on a beloved classic. We’ve crafted a meticulous recipe that captures the essence of traditional brioche: the irresistible soft crumb, subtle sweetness and rich, buttery flavour, while keeping carbohydrates low. This isn’t just another low-carb bread; it’s a keto miracle designed to satisfy your deepest bread cravings without compromise. Imagine tearing into a warm slice, its aroma filling your kitchen, safe in the knowledge that every bite aligns perfectly with your health and wellness journey.
Whether you’re a seasoned keto pro missing the simple pleasure of a good piece of bread or a beginner looking for delicious, satisfying low-carb options, this Keto Brioche Bread is about to become your new favourite. It’s ideal for spreading with butter, making indulgent breakfast sandwiches or even turning into keto-friendly French toast. Prepare to be amazed by how closely this grain-free, sugar-free version mirrors its high-carb counterpart, proving once and for all that keto baking can be extraordinary.
Nutritional information per serving (approximate values):
Calories: 280
Protein: 10 g
Carbohydrates: 5 g
Fat: 25 g
Fibre: 3 g
Sodium: 250 mg
Ingredients:
– 2 cups (224 g) of finely ground almond flour
– 1/4 cup (28 g) of coconut flour
– 2 tablespoons (14 g) of psyllium husk powder
– 2 teaspoons of baking powder
– 1/2 teaspoon of salt
– 1/4 cup (50 g) of erythritol or a preferred keto sweetener
– 1/2 cup (113 g) of unsalted butter, melted and cooled slightly
– 4 large eggs, at room temperature
– 1/2 cup (120 ml) of unsweetened almond milk, warmed
– 1 tablespoon of apple cider vinegar
– 1 teaspoon of vanilla extract (optional)
For the egg wash:
– 1 large egg yolk
– 1 tablespoon of almond milk
Instructions:
Prepare your equipment: Preheat your oven to 175°C (350°F). Grease and lightly flour (with almond flour) a standard loaf tin (21.5 x 11.5 cm) or a brioche mould.
Combine dry ingredients: In a large mixing bowl, whisk together the almond flour, coconut flour, psyllium husk powder, baking powder, salt and erythritol until the mixture is smooth and free of lumps. The psyllium husk powder is crucial for achieving a brioche-like texture, so make sure it is evenly distributed.
Combine the wet ingredients: In a separate medium bowl, whisk together the melted butter, eggs, warmed almond milk, apple cider vinegar and vanilla extract (if using). Make sure the butter is not too hot, otherwise it could scramble the eggs. The apple cider vinegar reacts with the baking powder to make the bread rise better and give it a slight tang.
Combine wet and dry ingredients: Pour the wet ingredients into the dry ingredients. Mix with a spatula or wooden spoon until a thick, uniform dough forms. The dough will be much thicker and stickier than traditional brioche dough, but this is normal for keto bread.
Rest the dough: Leave the dough to rest for 10–15 minutes. This gives the psyllium husk time to absorb the liquids and thicken the dough, which is essential for achieving the desired structure and texture.
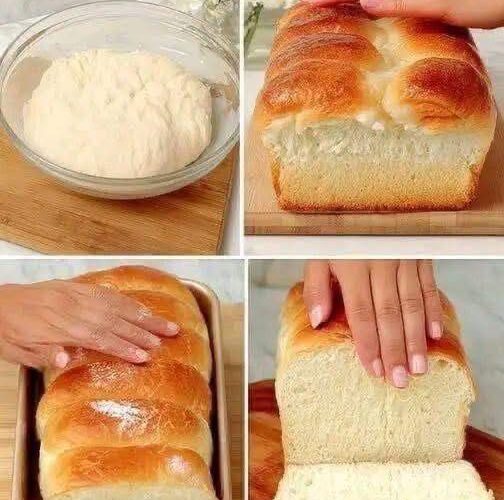
Shape the dough: After resting, the dough will be easier to work with. Transfer it to your prepared loaf tin. Gently press it down and smooth the top with a wet spatula. For a more traditional brioche look, divide the dough into three or four balls and arrange them in the tin.
Proofing (optional but recommended): Although keto doughs do not proof in the same way as yeast-based breads, a short warm rest can still improve the texture. Cover the loaf tin with a clean tea towel and leave in a warm, draught-free place for 20–30 minutes. This helps the baking powder activate further.
Prepare the egg wash: In a small bowl, whisk together the egg yolk and one tablespoon of almond milk. This will give your brioche a beautiful golden-brown crust.
Brush the top of the dough generously with the egg wash. Place the loaf tin in the preheated oven.
Bake for 40–50 minutes, or until the top is a deep golden brown and a skewer inserted into the centre comes out clean. If the top starts to brown too quickly, loosely tent it with aluminium foil.
Cooling: Once baked, remove the brioche from the oven. Leave it to cool in the tin for about 10–15 minutes before carefully transferring it to a wire rack to cool completely. Slicing it too soon can affect its texture.
Serving: Once cooled, slice and enjoy your delicious keto brioche bread!
Cooking tips and variations
To achieve the perfect keto brioche, you need to pay close attention to detail, but the results are well worth the effort. Here are some tips and ideas to take your baking to the next level:
Ingredient quality matters: Use finely ground almond flour rather than almond meal for the best texture. Also, make sure your psyllium husk powder is fresh, as this is a key binder and structural component.
Room Temperature Ingredients: Eggs and almond milk emulsify better with melted butter when at room temperature, resulting in a smoother, more consistent dough.
Don’t overmix: After combining the wet and dry ingredients, mix just until they are combined. Overmixing can lead to a tougher texture in gluten-free baking.
Proofing for texture: Although it is not a true yeast proof, leaving the dough to rest in a warm place for 20–30 minutes can help activate the raising agents and give the dough a lighter texture.
Watch for browning: Keto breads can brown quickly due to the almond flour. If the crust is getting too dark, loosely cover the loaf with aluminium foil for the rest of the baking time.
Variations:
Sweet brioche: add 1/2 teaspoon of pure stevia or monk fruit extract for extra sweetness, or a pinch of cinnamon to the dry ingredients.
Savoury brioche: Omit the vanilla extract. Add 1/2 cup of shredded cheddar cheese, 2 tablespoons of chopped chives or 1 teaspoon of garlic powder to the dry ingredients for a savoury twist.
Chocolate Chip Brioche: Fold in 1/2 cup of sugar-free chocolate chips after the dough has rested.
Lemon Zest: Add 1 tablespoon of fresh lemon zest to the wet ingredients for a bright, citrusy flavour.
Perfect Slices: Make sure the brioche is completely cool before slicing. This allows the internal structure to set fully and prevents crumbling. Use a serrated knife for the best results.
Storage and reheating
Proper storage and reheating will help to keep your Keto Brioche Bread delicious and fresh for as long as possible.
Countertop storage: Once the brioche has cooled completely, store it in an airtight container or resealable bag at room temperature for up to 2–3 days.
Refrigeration: For longer storage, refrigerate the brioche in an airtight container for up to 5–7 days. The texture may become slightly denser when chilled.
Freezing: Keto brioche freezes beautifully! Slice the cooled bread and place parchment paper between the slices to prevent them from sticking together. Store the slices in a freezer-safe bag or container for up to two to three months. You can also freeze the whole loaf.
Reheating from countertop/fridge:
Toaster: For individual slices, put them in a toaster or toaster oven until they are warmed through and slightly crispy.
For a whole loaf or multiple slices, preheat your oven to 150°C (300°F). Wrap the brioche in foil and heat for 10–15 minutes, or until warmed through.
Microwave: While quick, microwaving can sometimes make gluten-free bread rubbery. Heat individual slices for 10–20 seconds at a time until warm.
Reheating from frozen:
Toaster: Frozen slices can often be toasted directly from the freezer, though they may require slightly longer.
For a whole loaf, thaw in the refrigerator or on the counter overnight. Then reheat as you would from the countertop. For frozen slices, place them on a baking sheet and bake at 150°C (300°F) for 15–20 minutes, or until warmed through.
Frequently Asked Questions
What makes this brioche keto-friendly?
This brioche is keto-friendly because traditional high-carb wheat flour is replaced with low-carb alternatives such as almond flour and coconut flour. We also use a keto-approved sweetener (such as erythritol) instead of sugar, which significantly reduces the net carbohydrate count while maintaining a rich, delicious flavour.
Can I substitute the psyllium husk powder?
It is a crucial ingredient in this recipe, acting as a binder and providing the elasticity and structure that is often lacking in gluten-free and keto baking. Substituting it is not recommended as this will significantly alter the texture, potentially resulting in bread that is either crumbly or dense. If you must, adding a very small amount of xanthan gum (1/2 teaspoon) might help with the binding, but the texture will not be the same.
Why did my brioche come out dense or crumbly?
There are several reasons why keto brioche can be dense or crumbly. Firstly, ensure your almond flour is finely ground and not almond meal. Accurate measurements are vital, especially for psyllium husk powder and baking powder. Also, make sure your eggs and almond milk are at room temperature. Overmixing the dough can make it tougher, and slicing the brioche before it has cooled completely can make it crumble. Make sure your baking powder is fresh and active.
Can I make this recipe dairy-free?
Yes, it is easy to make this recipe dairy-free. Simply substitute the unsalted butter with a high-quality dairy-free alternative, such as Miyoko’s Kitchen Cultured Vegan Butter, and make sure your almond milk is unsweetened and dairy-free. For the egg wash, you can use just egg yolk or a plant-based milk wash to achieve a similar sheen.