Why You’ll Love This Recipe
- Perfectly named—truly chewy AND gooey in every bite
- Buttery shortbread-style crust that melts on your tongue
- Sticky, caramelized filling that stays soft and yielding
- Endlessly customizable with your favorite mix-ins
- Make-ahead friendly—actually better the next day
- Feeds a crowd from one simple pan
- No mixer required—just bowls and whisks
- Great for bake sales and potlucks—guaranteed to disappear first
- The texture everyone dreams about but rarely achieves
- Master this base and you’ll have infinite variations
Ingredients
For the Crust:
- 1 cup all-purpose flour
- ¼ cup granulated sugar
- ½ cup unsalted butter, cold, cut into small cubes
- ¼ teaspoon salt
For the Gooey Filling:
- 2 large eggs, room temperature
- 1 cup packed light brown sugar
- ½ cup light corn syrup or golden syrup
- ¼ cup unsalted butter, melted
- 1 teaspoon vanilla extract
- 2 tablespoons all-purpose flour
- ½ teaspoon baking powder
- ¼ teaspoon salt
- 1½ cups add-ins (see options below)
Classic Add-In Combinations:
- Chocolate Chip: 1½ cups semi-sweet chocolate chips
- Coconut Pecan: 1 cup sweetened shredded coconut + ½ cup chopped pecans
- Butterscotch: 1½ cups butterscotch chips
- Trail Mix: ¾ cup chocolate chips + ¾ cup mixed nuts and dried fruit
Equipment
- 8×8-inch or 9×9-inch baking pan
- Parchment paper
- Medium mixing bowl
- Large mixing bowl
- Pastry blender, two forks, or your fingertips
- Whisk
- Measuring cups and spoons
- Wire cooling rack
- Sharp knife
Step-by-Step Instructions
Step 1: Preheat and Prep Your Pan
Preheat your oven to 350°F (175°C). Line your 8×8-inch or 9×9-inch baking pan with parchment paper, leaving overhang on two opposite sides—this creates handles that make removing the bars a breeze. Give the parchment a light spray or brush of butter to prevent any sticking.
Step 2: Make the Shortbread Crust
In a medium bowl, whisk together the flour, sugar, and salt. Add the cold butter cubes and work them into the flour mixture using a pastry blender, two forks, or your fingertips. Keep working until the mixture looks like coarse crumbs with pea-sized butter pieces throughout. It should hold together when you squeeze a handful but still look crumbly and dry. If your butter starts to soften while you’re working, pop the whole bowl in the fridge for 10 minutes.
Step 3: Press and Par-Bake the Crust
Dump the crust mixture into your prepared pan and press it down firmly and evenly across the bottom. Really press—use the bottom of a measuring cup or glass to compact it into a solid layer. A loosely pressed crust crumbles when you cut the bars later. Bake for 12-15 minutes until just set and very lightly golden around the edges. Don’t overbake—it’s going back in with the filling and will continue cooking.
Step 4: Make the Gooey Filling
While your crust bakes, make the filling. In a large bowl, whisk together the room-temperature eggs, brown sugar, corn syrup, melted butter, and vanilla extract until completely smooth. Add the flour, baking powder, and salt and whisk just until no lumps remain. Fold in your chosen add-ins—chocolate chips, coconut and pecans, butterscotch chips, or whatever combination makes your heart happy.
Step 5: Assemble and Bake
When the crust comes out of the oven, immediately pour the filling over the warm crust and spread it into an even layer. Return to the oven and bake for 25-30 minutes. You’re looking for edges that are set and pulling away slightly from the sides, with a center that’s just barely jiggly when you gently shake the pan. A toothpick inserted near the center should come out with moist crumbs, not wet batter but definitely not clean. Slightly underbaked is the goal here—that’s what creates the signature gooey texture.
Step 6: Cool Completely (This Is Crucial)
Set the pan on a wire rack and let it cool completely at room temperature for at least 2 hours. I know this is torture when they smell that incredible, but warm bars will fall apart into a delicious mess when you try to cut them. For the cleanest, most beautiful slices, refrigerate for 1-2 hours after they’ve cooled to room temperature.
Step 7: Cut and Serve
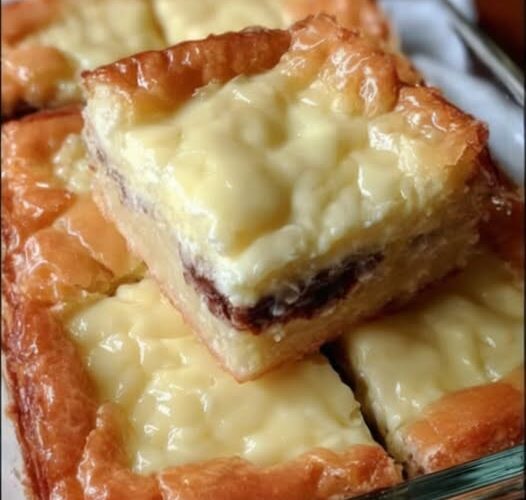
Use the parchment overhang to lift the entire slab out of the pan and onto a cutting board. Use a sharp knife to cut into squares, wiping the blade clean between each cut for the neatest edges. Marvel at how perfect they look and how gooey that center is.
Pro Tips
- Cold butter for the crust is non-negotiable. It creates a tender, flaky texture. If it warms up while working, refrigerate before pressing.
- Press the crust FIRMLY. This is the difference between bars that hold together and ones that crumble. Use real pressure.
- Don’t overbake. This is the single most important rule. Slight jiggle in the center is exactly what you want—they continue cooking as they cool.
- Cool completely before cutting. Patience is painful but necessary for clean, beautiful squares instead of a delicious disaster.
- Room temperature eggs matter. Cold eggs can seize the melted butter and create a grainy texture instead of smooth filling.
- Customize freely. This base recipe is endlessly adaptable—see variations for inspiration.
Variations & Substitutions
- Chocolate Caramel: Use chocolate chips, then drizzle with caramel sauce and sprinkle with flaky sea salt after baking.
- Peanut Butter: Substitute ¼ cup peanut butter for ¼ cup of the melted butter. Use peanut butter chips and chocolate chips as add-ins.
- Salted Brown Butter: Brown the butter for the filling before using—adds incredible nutty depth. Sprinkle with flaky sea salt after baking.
- Lemon: Replace vanilla with lemon extract, add 2 tablespoons lemon zest to filling, omit chocolate/nuts, use ½ cup dried cranberries if desired.
- Mint Chocolate: Replace vanilla with peppermint extract, use chocolate chips, top with crushed candy canes.
- Gluten-free: Use 1:1 gluten-free flour blend in both crust and filling. Texture will be slightly different but still delicious.
- Vegan: Use vegan butter, flax eggs (2 tablespoons flaxseed meal + 6 tablespoons water), maple syrup instead of corn syrup, and vegan chocolate chips.
Serving, Pairing & Storage
How to Serve:
These are perfect at room temperature, but they’re also incredible served slightly warm with vanilla ice cream melting on top. Cut into generous squares and serve on a platter, or individually wrap for portable sweetness.
Why You’ll Love This Recipe
- Perfectly named—truly chewy AND gooey in every bite
- Buttery shortbread-style crust that melts on your tongue
- Sticky, caramelized filling that stays soft and yielding
- Endlessly customizable with your favorite mix-ins
- Make-ahead friendly—actually better the next day
- Feeds a crowd from one simple pan
- No mixer required—just bowls and whisks
- Great for bake sales and potlucks—guaranteed to disappear first
- The texture everyone dreams about but rarely achieves
- Master this base and you’ll have infinite variations
Ingredients
For the Crust:
- 1 cup all-purpose flour
- ¼ cup granulated sugar
- ½ cup unsalted butter, cold, cut into small cubes
- ¼ teaspoon salt
For the Gooey Filling:
- 2 large eggs, room temperature
- 1 cup packed light brown sugar
- ½ cup light corn syrup or golden syrup
- ¼ cup unsalted butter, melted
- 1 teaspoon vanilla extract
- 2 tablespoons all-purpose flour
- ½ teaspoon baking powder
- ¼ teaspoon salt
- 1½ cups add-ins (see options below)
Classic Add-In Combinations:
- Chocolate Chip: 1½ cups semi-sweet chocolate chips
- Coconut Pecan: 1 cup sweetened shredded coconut + ½ cup chopped pecans
- Butterscotch: 1½ cups butterscotch chips
- Trail Mix: ¾ cup chocolate chips + ¾ cup mixed nuts and dried fruit
Equipment
- 8×8-inch or 9×9-inch baking pan
- Parchment paper
- Medium mixing bowl
- Large mixing bowl
- Pastry blender, two forks, or your fingertips
- Whisk
- Measuring cups and spoons
- Wire cooling rack
- Sharp knife
Step-by-Step Instructions
Step 1: Preheat and Prep Your Pan
Preheat your oven to 350°F (175°C). Line your 8×8-inch or 9×9-inch baking pan with parchment paper, leaving overhang on two opposite sides—this creates handles that make removing the bars a breeze. Give the parchment a light spray or brush of butter to prevent any sticking.
Step 2: Make the Shortbread Crust
In a medium bowl, whisk together the flour, sugar, and salt. Add the cold butter cubes and work them into the flour mixture using a pastry blender, two forks, or your fingertips. Keep working until the mixture looks like coarse crumbs with pea-sized butter pieces throughout. It should hold together when you squeeze a handful but still look crumbly and dry. If your butter starts to soften while you’re working, pop the whole bowl in the fridge for 10 minutes.
Step 3: Press and Par-Bake the Crust
Dump the crust mixture into your prepared pan and press it down firmly and evenly across the bottom. Really press—use the bottom of a measuring cup or glass to compact it into a solid layer. A loosely pressed crust crumbles when you cut the bars later. Bake for 12-15 minutes until just set and very lightly golden around the edges. Don’t overbake—it’s going back in with the filling and will continue cooking.
Step 4: Make the Gooey Filling
While your crust bakes, make the filling. In a large bowl, whisk together the room-temperature eggs, brown sugar, corn syrup, melted butter, and vanilla extract until completely smooth. Add the flour, baking powder, and salt and whisk just until no lumps remain. Fold in your chosen add-ins—chocolate chips, coconut and pecans, butterscotch chips, or whatever combination makes your heart happy.
Step 5: Assemble and Bake
When the crust comes out of the oven, immediately pour the filling over the warm crust and spread it into an even layer. Return to the oven and bake for 25-30 minutes. You’re looking for edges that are set and pulling away slightly from the sides, with a center that’s just barely jiggly when you gently shake the pan. A toothpick inserted near the center should come out with moist crumbs, not wet batter but definitely not clean. Slightly underbaked is the goal here—that’s what creates the signature gooey texture.
Step 6: Cool Completely (This Is Crucial)
Set the pan on a wire rack and let it cool completely at room temperature for at least 2 hours. I know this is torture when they smell that incredible, but warm bars will fall apart into a delicious mess when you try to cut them. For the cleanest, most beautiful slices, refrigerate for 1-2 hours after they’ve cooled to room temperature.
Step 7: Cut and Serve
Use the parchment overhang to lift the entire slab out of the pan and onto a cutting board. Use a sharp knife to cut into squares, wiping the blade clean between each cut for the neatest edges. Marvel at how perfect they look and how gooey that center is.
Pro Tips
- Cold butter for the crust is non-negotiable. It creates a tender, flaky texture. If it warms up while working, refrigerate before pressing.
- Press the crust FIRMLY. This is the difference between bars that hold together and ones that crumble. Use real pressure.
- Don’t overbake. This is the single most important rule. Slight jiggle in the center is exactly what you want—they continue cooking as they cool.
- Cool completely before cutting. Patience is painful but necessary for clean, beautiful squares instead of a delicious disaster.
- Room temperature eggs matter. Cold eggs can seize the melted butter and create a grainy texture instead of smooth filling.
- Customize freely. This base recipe is endlessly adaptable—see variations for inspiration.
Variations & Substitutions
- Chocolate Caramel: Use chocolate chips, then drizzle with caramel sauce and sprinkle with flaky sea salt after baking.
- Peanut Butter: Substitute ¼ cup peanut butter for ¼ cup of the melted butter. Use peanut butter chips and chocolate chips as add-ins.
- Salted Brown Butter: Brown the butter for the filling before using—adds incredible nutty depth. Sprinkle with flaky sea salt after baking.
- Lemon: Replace vanilla with lemon extract, add 2 tablespoons lemon zest to filling, omit chocolate/nuts, use ½ cup dried cranberries if desired.
- Mint Chocolate: Replace vanilla with peppermint extract, use chocolate chips, top with crushed candy canes.
- Gluten-free: Use 1:1 gluten-free flour blend in both crust and filling. Texture will be slightly different but still delicious.
- Vegan: Use vegan butter, flax eggs (2 tablespoons flaxseed meal + 6 tablespoons water), maple syrup instead of corn syrup, and vegan chocolate chips.
Serving, Pairing & Storage
How to Serve:
These are perfect at room temperature, but they’re also incredible served slightly warm with vanilla ice cream melting on top. Cut into generous squares and serve on a platter, or individually wrap for portable sweetness.